注意!本指南为进阶指南
请确保你之前已经独立完成过分离部署 NapCat 或者 LLBot,并了解其中每项设置的含义。本指南不再讲解基础概念!
—
💡常见问题 (FAQ)
Q:为什么不用 WSL2 反而用 WSL1?
A:虽然 WSL2 性能更好……但是动态ip,每次重启服务器都要搞更多的端口转发,很麻烦的!WSL1 就完全没有这个负担,直接 127.0.0.1 就解决了!而且 WSL1 没有 Linux 内核,也没有虚拟机,像是一个翻译层,所以不需要为操作系统本身预留内存。它的内存开销几乎等同于在 Windows 上直接运行一个普通的 .exe 程序,内存占用极低。
Q:为什么不直接在 Windows 上分离部署 NapCat / LLBot?
A:Linux 版本的 QQ 协议目前风控更少、更稳定!相比 Windows 版,公认的更稳!
Q:为什么不用 Docker?
A:我也很想用……可是我鼓捣了好久发现我的 Windows Server 2019 服务器始终装不上 Linux Docker,所以才选择使用 WSL 的
Q:这么费劲,我为什么不直接选择 Linux 服务器?
A:OlivOS 其实更适合 Windows 服务器部署,很多 GUI 界面 Linux 服务器是看不到的
适用环境:Windows Server 2019 及以上 (或 Win10/11)
—
📋 目录
- 环境准备:开启 WSL 功能
- 系统安装:安装 Ubuntu
- 环境配置:Linux 基础依赖安装
- NapCat部署:NapCat 安装与配置 (WSL 端)
- 兼容桥接:部署 Python 路径修复代理 (Windows 端)
- OlivOS连接:OlivOS 配置与启动
- 持久化:开机自启设置(可选)
—
一:开启 WSL 功能 (Windows 端)
在 Windows Server 上,必须先手动开启子系统功能并重启。
- 以 管理员模式 打开 PowerShell。
- 运行以下命令让 Windows Server 允许运行 Linux 子系统:
Enable-WindowsOptionalFeature -Online -FeatureName Microsoft-Windows-Subsystem-Linux
- 运行以下命令开启虚拟机平台功能(增强兼容性):
Enable-WindowsOptionalFeature -Online -FeatureName VirtualMachinePlatform
- ⚠️ 必须重启服务器 才能生效。
—
二:安装 Ubuntu 系统 (离线/在线方案)
方法一:一键安装指令 (仅限 Server 2022 或 Win10 2004+)
如果使用的是 Windows Server 2022、Win10 (2004+) 或 Win11,且网络能连上微软服务器——那么就直接用这个吧
- 管理员模式打开 PowerShell。
- 输入:
wsl --install -d Ubuntu-20.04
- 如果进度条走完并提示重启,那么直接可以跳到第三步!
- 如果报错或无反应(Server 2019 常态),请使用下面的方法二。
方法二:使用应用商店抓取站离线安装 (推荐)
首先嘛……如果你能稳定连接微软服务,那么可以使用官方直链下载:https://aka.ms/wslubuntu2004
很显然,几十几百kb去下载那900m……猴年马月!那么使用第三方吧!
(其实这个第三方也很慢……但是比微软直链还是快很多倍的!)
(而且,微软直链我挂梯子是50-100kb/s,这个第三方我挂梯子能飚到10+mb/s!)
1. 下载链接
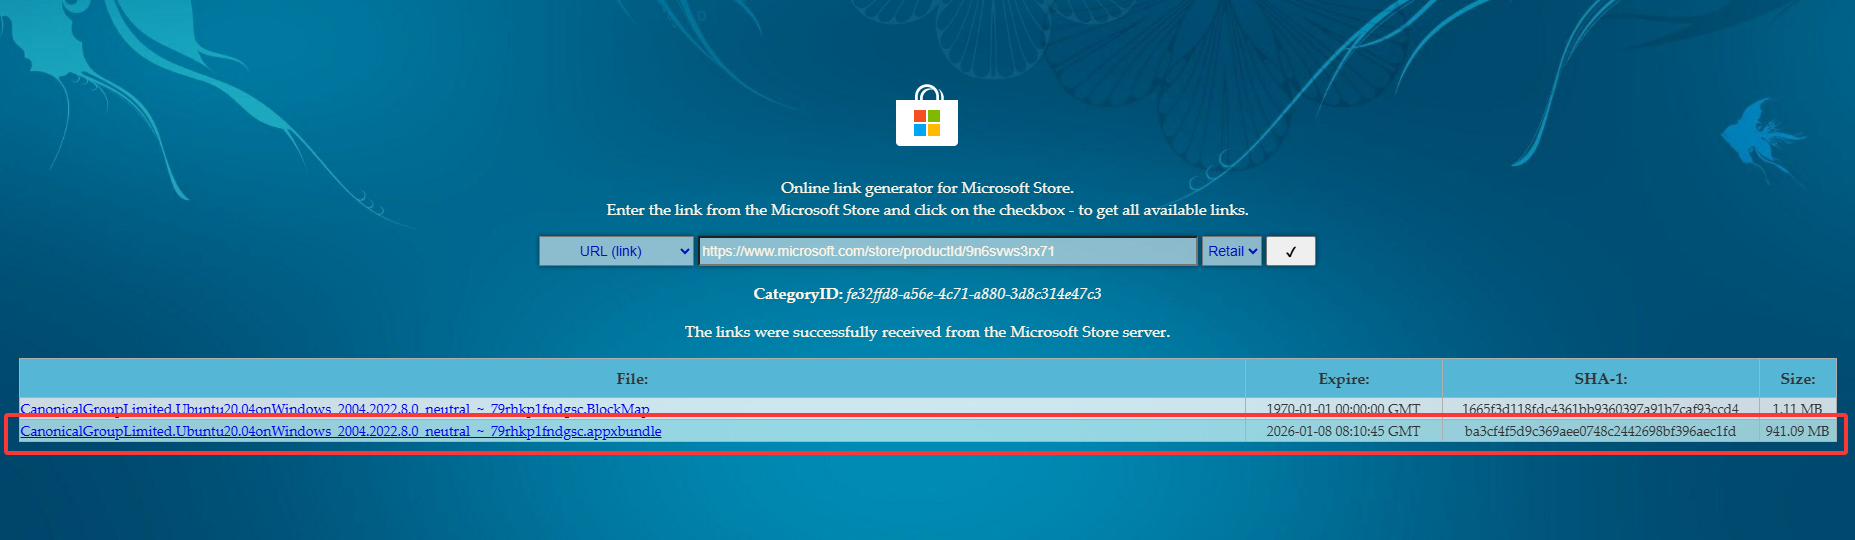
- 直接在服务器上(或者网速快的电脑上)打开这个网站网站:https://store.rg-adguard.net/
- 输入参数:
- 第一个下拉框:URL (link)
- 中间输入框:
https://www.microsoft.com/store/productId/9n6svws3rx71 (Ubuntu 20.04 地址)
- 右边下拉框:Retail(当然 RP 也行)
- 点击右侧的勾勾
2. 下载目标文件
列表加载后,找到符合以下特征的文件下载:
- 文件名:包含
CanonicalGroupLimited...Ubuntu...20.04...x64,我这里显示的是CanonicalGroupLimited.Ubuntu20.04onWindows_2004.2022.8.0_neutral_~_79rhkp1fndgsc.appxbundle
- 后缀:通常是
.appxbundle
- 大小:900MB - 1GB 左右
3. 套娃解压安装
由于下载的是 Bundle 包,里面包含多种 CPU 架构的文件,我们需要剥离出 x64 版本。
第一层解压:
- 将后缀名从
.appxbundle 改为 .zip。
- 右键解压。
寻找核心包:
- 进入解压后的文件夹,找到一个文件名包含
x64 且后缀为 .appx 的文件。
- 注意:这个文件大小通常在 400MB - 500MB 左右。不要选 ARM 的,也不要选几 KB 的 blockmap。
第二层解压:
- 将这个
.appx 文件的后缀名也改为 .zip。
- 如果还没上传服务器的话,这时候就可以将这个核心包上传服务器了
- 再次右键解压这个新压缩包。
转移路径:
- 这个文件夹就是你的 WSL 子系统所在文件夹!所以一定要转移到一个合适的位置!
- 我就将这个文件夹转移到了
E:\Ubuntu
运行:
- 进入最后一次解压的文件夹。
- 找到
ubuntu2004.exe
- 双击运行。
- 黑框弹出提示
Installing...,稍等片刻后设置 Username (用户名) 和 Password (密码) 即完成安装。
- 注意:因为 Linux 的特性,你入密码时屏幕上是什么都不会显示的(没有星号,光标不动),这是正常的! 凭自己的感觉输完就行!
—
三:Linux 环境基础配置 (WSL 端)
进入 Ubuntu 黑框(WSL 终端)。
注意:使用sudo命令时要输入密码!
1. 换源 (可选,如果下载慢)
sudo sed -i 's/archive.ubuntu.com/mirrors.aliyun.com/g' /etc/apt/sources.list
sudo sed -i 's/security.ubuntu.com/mirrors.aliyun.com/g' /etc/apt/sources.list
2. 安装必要依赖
一次性安装 NapCat 和后续步骤需要的工具:
sudo apt update
sudo apt install -y curl wget screen git python3 python3-pip libgbm-dev libasound2 unzip
—
四:部署 NapCat (WSL 端)
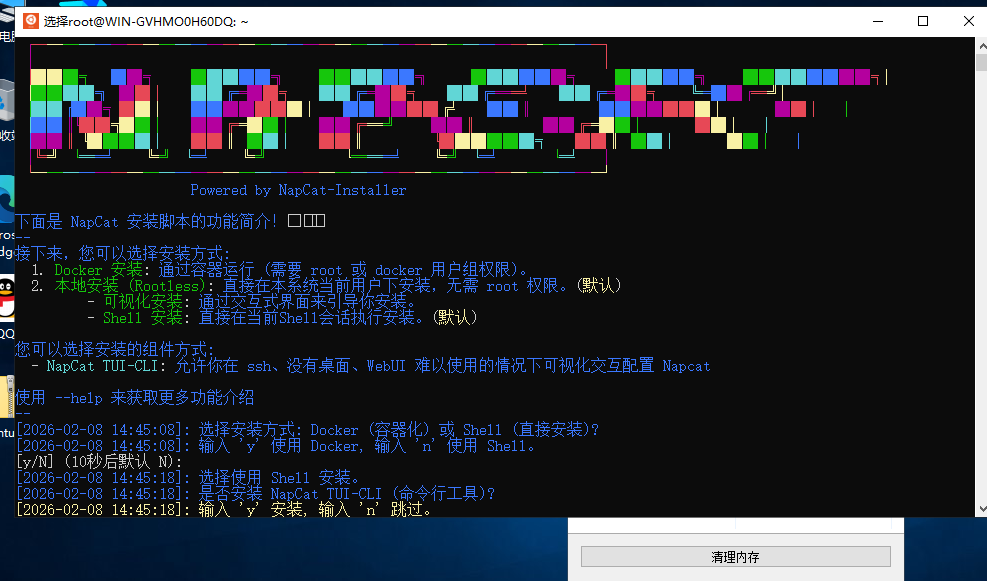
1. 一键安装
curl -o napcat.sh https://nclatest.znin.net/NapNeko/NapCat-Installer/main/script/install.sh && sudo bash napcat.sh
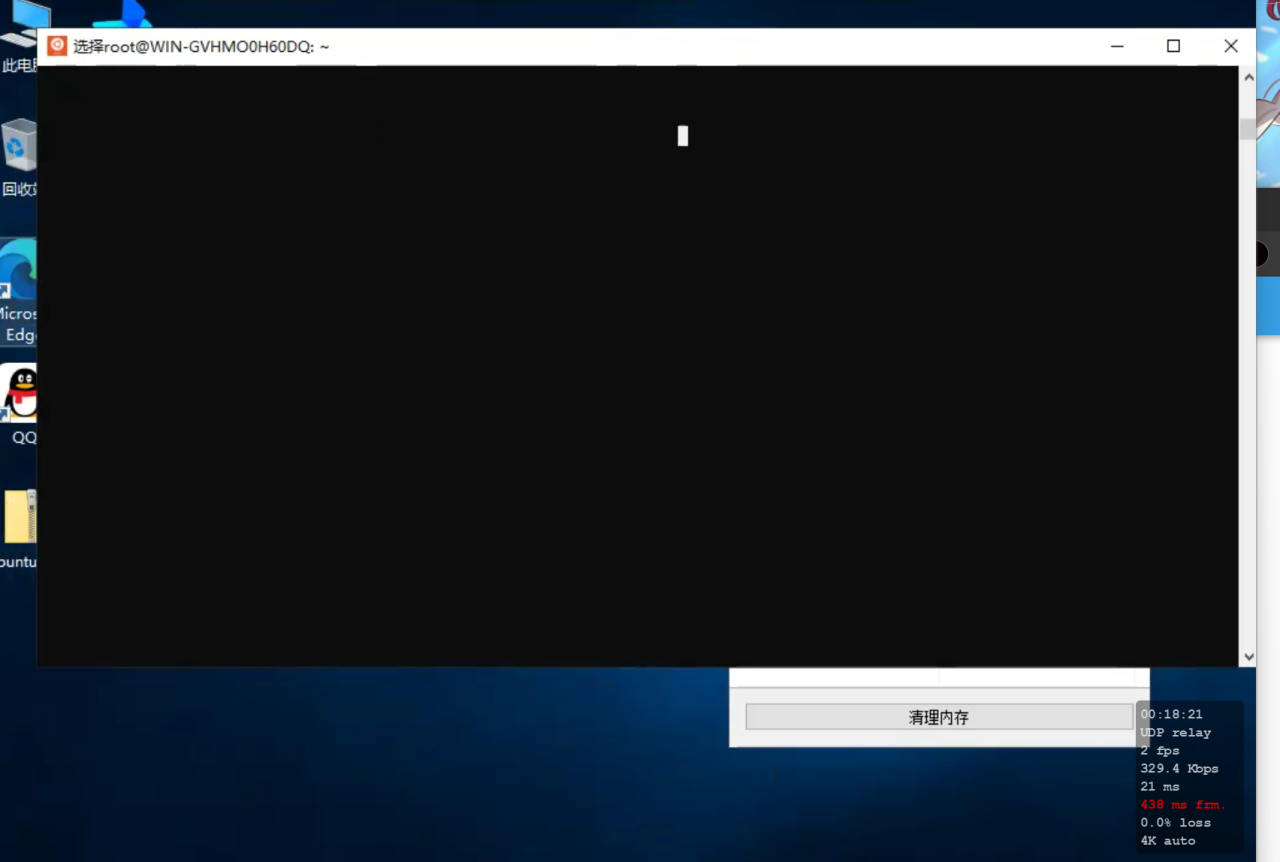
小贴士:如果出现这样的黑屏情况,这是系统的问题,可以把右边的滚动条往上拉,这样就能看到内容了。这时候记住里面的内容,盲打就行。
别选择docker安装!wsl1用docker安装可能会有杂七杂八的问题!
2. 进行基础配置
填写对应的 HTTP 上报地址和 HTTP 服务,此处不再进行赘述。因为使用的是 WSL1,子系统和主机共用一个 IP 地址,所以进入 NapCat 的 WebUI 直接在外面的 Windows 上打开浏览器输入 127.0.0.1:6099 就行!
⚠️注意!
这里的 HTTP 端口号一定不能和你 OlivOS 里面的端口号相同!具体下面一步会讲,要做端口转发!
—
五:部署 Windows 路径修复代理 (Windows 端)
如果你是在外面的 Windows 搭建的 OlivOS,那么发送的文件路径是 Windows 格式 (E:\xxx),WSL 里的 NapCat 无法识别,发不出来图片,语音等,所以我们需要一个 Python 脚本在中间做翻译。
1. 安装 Python
在 Windows Server 上下载安装 Python 3,安装时一定要勾选 “Add Python to PATH”。
(当然你也可以在 WSL 里面完成,哪边都行)
2. 安装依赖
打开 CMD 运行:
pip install flask requests aiohttp
3. 创建端口转发脚本
注意这里以OlivOS 端口为 10149,NapCat 端口为 10150为例子
在 Windows 任意位置(如 C:\NapCatTools\)或者在你的 WSL 子系统里新建 proxy.py,丢入以下进行端口转发(支持多账号):
import asyncio
import json
import logging
import re
import sys
import threading

import requests
from flask import Flask, jsonify, request

try:
    from aiohttp import ClientSession, ClientTimeout, WSMsgType, web
except ImportError as exc:
    ClientSession = None
    ClientTimeout = None
    WSMsgType = None
    web = None
    AIOHTTP_IMPORT_ERROR = exc
else:
    AIOHTTP_IMPORT_ERROR = None

# ================= 🤖 多账号配置区 🤖 =================
# HTTP 格式:{"name": "账号备注", "listen": HTTP监听端口, "target": NapCat HTTP端口}
# WS 格式:{"name": "账号备注", "reverse_ws": {"listen": WS监听端口, "target": 下游WS地址}}
# HTTP 和 WS 配置相互独立:写了就启动,没写就不启动,也可以同时配置
BOT_CONFIGS = [
    # 第 1 个账号
    {
        "name": "fu5",
        "listen": 18012,  # OlivOS 连这个
        "target": 18013,  # 转发给 WSL 的 10150
    },
    # 第 2 个账号
    {
        "name": "zhuakid",
        # NapCat 等连 ws://本机IP:9632/任意路径,代理再连接下面的 NoneBot 地址
        "reverse_ws": {
            "listen": 9632,
            "target": "ws://127.0.0.1:9633/onebot/v11/ws",
            # 下游需要单独鉴权时可取消注释;同名请求头会覆盖上游传来的值
            # "headers": {"Authorization": "Bearer your-token"},
        },
    },
    # 第 3 个账号
    {
        "name": "zhuamadeline",
        "reverse_ws": {
            "listen": 9634,
            "target": "ws://127.0.0.1:9635/onebot/v11/ws",
            # 下游需要单独鉴权时可取消注释;同名请求头会覆盖上游传来的值
            # "headers": {"Authorization": "Bearer your-token"},
        },
    },
    # 如果有更多,继续复制上面的块...
]
# =======================================================

print("==========================================")
print("[SYSTEM] Multi-Port Proxy Started")
print("[MODE]   Detailed Logs & Smart Path Fix")
print(f"[ACCOUNTS] {len(BOT_CONFIGS)} bots configured")
print("==========================================\n")


def convert_path_to_wsl(text):
    """
    智能转换函数:只转换真正的 Windows 路径,忽略 URL 协议头
    """
    if not isinstance(text, str):
        return text

    # 正则逻辑:排除 :// 协议头,只匹配 E:\ 或 E:/ 格式
    pattern = r"(?<![a-zA-Z])([a-zA-Z]):(?!//)([\\/][^,\]\"<>\s]+)"

    def replace_callback(match):
        drive = match.group(1).lower()
        path_rest = match.group(2).replace("\\", "/")
        new_path = f"/mnt/{drive}{path_rest}"
        # 返回修改后的路径,日志在外部打印以免混乱
        return new_path

    if ":" in text and ("\\" in text or "/" in text):
        return re.sub(pattern, replace_callback, text)
    return text


def fix_json_recursive(data, bot_name):
    """递归清洗所有字段,并记录日志"""
    modified = False
    if isinstance(data, dict):
        for k, v in data.items():
            if isinstance(v, str):
                new_v = convert_path_to_wsl(v)
                if new_v != v:
                    print(f"[{bot_name}] [FIX] {v} -> {new_v}")
                    data[k] = new_v
                    modified = True
            else:
                modified = fix_json_recursive(v, bot_name) or modified
    elif isinstance(data, list):
        for i, item in enumerate(data):
            if isinstance(item, str):
                new_item = convert_path_to_wsl(item)
                if new_item != item:
                    print(f"[{bot_name}] [FIX] {item} -> {new_item}")
                    data[i] = new_item
                    modified = True
            else:
                modified = fix_json_recursive(item, bot_name) or modified
    return modified


def rewrite_websocket_message(message, bot_name):
    """只在 JSON 文本帧中确实修改了路径时重新编码。"""
    if not isinstance(message, str):
        return message

    try:
        data = json.loads(message)
    except (json.JSONDecodeError, TypeError):
        return message

    if not fix_json_recursive(data, bot_name):
        return message
    return json.dumps(data, ensure_ascii=False, separators=(",", ":"))


WS_HANDSHAKE_HEADERS = {
    "connection",
    "host",
    "proxy-connection",
    "sec-websocket-extensions",
    "sec-websocket-key",
    "sec-websocket-protocol",
    "sec-websocket-version",
    "upgrade",
}


def build_target_headers(request_headers, configured_headers):
    """透传业务握手头,让 aiohttp 重新生成 WebSocket 协议头。"""
    headers = {key: value for key, value in request_headers.items() if key.lower() not in WS_HANDSHAKE_HEADERS}
    for key, value in (configured_headers or {}).items():
        old_key = next((item for item in headers if item.lower() == key.lower()), None)
        if old_key is not None:
            del headers[old_key]
        if key.lower() not in WS_HANDSHAKE_HEADERS and value is not None:
            headers[key] = str(value)
    return headers


async def relay_websocket(source, destination, bot_name, direction):
    """将一侧的文本和二进制消息逐帧转发到另一侧。"""
    async for message in source:
        if message.type == WSMsgType.TEXT:
            payload = rewrite_websocket_message(message.data, bot_name)
            await destination.send_str(payload)
        elif message.type == WSMsgType.BINARY:
            await destination.send_bytes(message.data)
        elif message.type == WSMsgType.ERROR:
            raise RuntimeError(f"{direction}: {source.exception()}")


async def reverse_ws_handler(request, config):
    bot_name = config["name"]
    target_url = config["target"]
    source_ws = web.WebSocketResponse(autoping=True, heartbeat=30, max_msg_size=0)
    if not source_ws.can_prepare(request).ok:
        return web.Response(status=400, text="A WebSocket upgrade is required")

    headers = build_target_headers(request.headers, config.get("headers"))
    timeout = ClientTimeout(total=None, connect=10, sock_connect=10)

    session = ClientSession(timeout=timeout, trust_env=False)
    try:
        target_ws = await session.ws_connect(
            target_url,
            headers=headers,
            autoping=True,
            heartbeat=30,
            max_msg_size=0,
        )
    except Exception as exc:
        await session.close()
        print(f"[{bot_name}] [WS ERROR] Cannot connect to {target_url}: {exc}")
        return web.Response(status=502, text=f"Cannot connect to WebSocket target: {exc}")

    try:
        await source_ws.prepare(request)
    except Exception:
        await target_ws.close()
        await session.close()
        raise

    peer_name = request.remote or "unknown"
    print(f"[{bot_name}] [WS OPEN] {peer_name}{request.rel_url} -> {target_url}")

    relay_tasks = {
        asyncio.create_task(relay_websocket(source_ws, target_ws, bot_name, "source -> target")),
        asyncio.create_task(relay_websocket(target_ws, source_ws, bot_name, "target -> source")),
    }
    try:
        done, pending = await asyncio.wait(relay_tasks, return_when=asyncio.FIRST_COMPLETED)
        for task in pending:
            task.cancel()
        if pending:
            await asyncio.gather(*pending, return_exceptions=True)
        for task in done:
            task.result()
    except Exception as exc:
        print(f"[{bot_name}] [WS ERROR] Relay stopped: {exc}")
    finally:
        for task in relay_tasks:
            if not task.done():
                task.cancel()
        await asyncio.gather(*relay_tasks, return_exceptions=True)
        await target_ws.close()
        await source_ws.close()
        await session.close()
        print(f"[{bot_name}] [WS CLOSE] {peer_name} disconnected")

    return source_ws


async def run_reverse_ws_server_async(config):
    app = web.Application()
    app.router.add_route("GET", "/{path:.*}", lambda request: reverse_ws_handler(request, config))
    runner = web.AppRunner(app, access_log=None)
    await runner.setup()
    site = web.TCPSite(runner, config.get("host", "0.0.0.0"), config["listen"])
    await site.start()
    print(f"[{config['name']}] [WS READY] Listen {config['listen']} -> {config['target']}")
    try:
        await asyncio.Event().wait()
    finally:
        await runner.cleanup()


def run_reverse_ws_server(config):
    try:
        asyncio.run(run_reverse_ws_server_async(config))
    except Exception as exc:
        print(f"[{config['name']}] [WS FATAL] {exc}")


def run_proxy_server(config):
    """
    为每个账号启动独立的 Flask 服务
    """
    bot_name = config["name"]
    listen_port = config["listen"]
    target_port = config["target"]
    target_base_url = f"http://127.0.0.1:{target_port}"

    app = Flask(bot_name)

    # 禁用 Flask 默认日志,防止控制台刷屏
    log = logging.getLogger("werkzeug")
    log.setLevel(logging.ERROR)

    print(f"✅ [{bot_name}] Ready: Listen {listen_port} -> Target {target_port}")

    @app.route("/", defaults={"path": ""}, methods=["POST", "GET"])
    @app.route("/<path:path>", methods=["POST", "GET"])
    def proxy(path):
        # 简单心跳日志(可根据需要注释掉以免太吵)
        print(f"[{bot_name}] [RECV] /{path}")

        try:
            params = request.args.to_dict()
            json_data = request.json

            # === 详细日志 (可选) ===
            # if json_data:
            #     print(f"[{bot_name}] [DEBUG] Payload captured")

            # 2. 执行路径修复
            if json_data:
                fix_json_recursive(json_data, bot_name)

            # 3. 转发给 NapCat
            target_url = f"{target_base_url}/{path}"

            resp = requests.request(
                method=request.method,
                url=target_url,
                params=params,
                json=json_data,
                headers={k: v for k, v in request.headers.items() if k.lower() != "host"},
            )

            # 4. 打印结果
            if resp.status_code != 200:
                print(f"[{bot_name}] [WARN] NapCat Status: {resp.status_code}")
                # print(f"[{bot_name}] [RESP] {resp.content.decode('utf-8', errors='ignore')}")

            return (resp.content, resp.status_code, resp.headers.items())

        except Exception as e:
            print(f"[{bot_name}] [ERROR] {e}")
            return jsonify({"status": "failed", "msg": str(e)}), 500

    # 启动 Flask (threaded=True 是默认的,但这里我们在外层已经用了线程)
    app.run(host="0.0.0.0", port=listen_port, use_reloader=False)


if __name__ == "__main__":
    threads = []

    # HTTP 与反向 WS 分别按配置启动
    for conf in BOT_CONFIGS:
        bot_name = conf.get("name", "unnamed")
        reverse_ws = conf.get("reverse_ws")
        has_http = "listen" in conf or "target" in conf
        has_ws = reverse_ws is not None

        if not has_http and not has_ws:
            print(f"[{bot_name}] [SKIP] No HTTP or reverse_ws configuration")
            continue

        if has_http:
            missing_keys = [key for key in ("listen", "target") if key not in conf]
            if missing_keys:
                print(f"[{bot_name}] [CONFIG ERROR] HTTP missing: {', '.join(missing_keys)}")
            else:
                http_thread = threading.Thread(target=run_proxy_server, args=(conf,), daemon=True)
                http_thread.start()
                threads.append(http_thread)

        if has_ws:
            if not isinstance(reverse_ws, dict):
                print(f"[{bot_name}] [CONFIG ERROR] reverse_ws must be a dict")
                continue
            missing_keys = [key for key in ("listen", "target") if key not in reverse_ws]
            if missing_keys:
                print(f"[{bot_name}] [CONFIG ERROR] reverse_ws missing: {', '.join(missing_keys)}")
                continue
            if AIOHTTP_IMPORT_ERROR is not None:
                print(f"[{bot_name}] [WS FATAL] aiohttp is required: {AIOHTTP_IMPORT_ERROR}")
                continue

            ws_config = {**reverse_ws, "name": bot_name}
            ws_thread = threading.Thread(target=run_reverse_ws_server, args=(ws_config,), daemon=True)
            ws_thread.start()
            threads.append(ws_thread)

    try:
        # 保持主线程存活,否则守护线程会直接退出
        while True:
            # 这里 join 一个超长时间,或者 sleep
            # 使用 join 可以让主线程等待子线程(实际上永远在等)
            for t in threads:
                t.join(1)
    except KeyboardInterrupt:
        print("\n[SYSTEM] Stopping all proxies...")
        sys.exit(0)
4. 运行测试
此处以 Windows 上为例
- 新建一个
start_proxy.bat
python proxy.py
pause
双击 start_proxy.bat,保持黑框开启。
—
六:配置 OlivOS (Windows 端)
进行正常配置即可,注意端口一定要填写正确!(本指南例:10149)
启动连接。
- 发送指令
- 观察上面的转发脚本 CMD 黑框是否有日志
- 观察 QQ 里面是否成功发出来
- 继续尝试发送图片,确认日志显示
[FIX] E:\... -> /mnt/e/...,并且能正常接收到图片
—
七:设置开机自启(注意!这里纯是AI给的,我只是略做修改,并没有测试过,仅供参考!)
1. 自启 Python 代理
之前的start_proxy.bat创建一个快捷方式
2. 自启 WSL NapCat
新建 StartNapCat.bat:
@echo off
wsl screen -dmS napcat bash -c "cd /home/你的用户名/NapCat && ./napcat.sh -q 你的QQ号; exec bash"
(注意替换上面的“你的用户名”和“你的QQ号”)
创造一个快捷方式
3. 加入启动项
- 按
Win + R,输入 shell:startup。
- 将上面的
start_proxy.bat 和 StartNapCat.bat 文件的快捷方式拖入该文件夹。
—
🎉 到这里就部署完成了!具体还有任何疑问可以留言交流!
碎碎念:大晚上用手机鼓捣了 4 个小时.jpg,真的要感谢 AI,感谢哈基米的大力指导啊.jpg