前言
Q:为什么要做本教程?
A:实际上是因为目前众多插件的回复都是写死在 opk 里面的,每次修改都得拆包,不太方便,所以我想通过这个教程让大家写插件的时候,都能把回复放到 GUI 里面方便自定义,方便自己也方便他人
Q:使用这个教程去写插件有什么好处?
A:第一个好处上面也已经说了;第二个好处就是在于可以在bot off的情况下通过@来触发插件;第三个好处就是可以注入help,也就是说可以用.help 你写的内容来自定义 help;最后一个好处就是,骰娘的说话内容会被录入到log里!,正常来说骰娘发出的消息不会录入log里,而这种方法会,这样子也更方便于编写扩展规则!
Q:阅读这个教程有什么前提条件?
A:首先你应该需要了解如何开发 OlivOS 插件的基础内容:开发手册 - OlivOS官方文档,里面讲过的这里就不再赘述了。并且确保你自己能独立使用Python开发插件,毕竟本教程也只是写一点框架,最终还是要你自己去自行写功能的。
Q:会提供对应的插件模板吗?
A:会的,我会打包好插件模板以供大家下载!
前情提示
使用本插件模板,务必先用VS Code或其他编辑器将所有的YourPluginName全局替换成你的插件名称,记得文件夹也得改名,大小写必须一致!
插件模板下载地址
插件结构
和标准插件模板略有不同的是,本插件模板的默认结构如下
YourPluginName/
├── app.json
├── __init__.py
├── main.py
├── msgReply.py
├── msgCustom.py
└── msgCustomManager.py
可以看到除了最基础的__init__.py、main.py和app.json以外,本插件还多了三个文件:msgReply.py,msgCustom.py,msgCustomManager.py。
接下来我将详细地解释一下这六个文件共起到什么作用
自述文件(app.json)
具体通常如下
{
    "name" : "插件模板",
    "author" : "Desom-fu",
    "namespace" : "YourPluginName",
    "message_mode" : "old_string",
    "info" : "这里是插件模板的描述信息。若需要修改插件NameSpace,请使用VSCode或其他软件全局替换将YourPluginName替换为你的插件名称。插件优先级建议小于20000,这样bot off后at bot才有回复,并且正常bot off可关闭。",
    "version" : "1.0.0",
    "svn" : 1,
    "compatible_svn" : 100,
    "priority" : 19990,
    "support" : [
        {
            "sdk" : "onebot",
            "platform" : "qq",
            "model" : "all"
        },
        {
            "sdk" : "all",
            "platform" : "all",
            "model" : "all"
        }
    ],
    "menu_config": [
        {
            "title": "插件菜单1",
            "event": "YourPluginName_Menu_001"
        },
        {
            "title": "插件菜单2",
            "event": "YourPluginName_Menu_002"
        }
    ]
}
我们可以看到,与标准模板有这一个部分不同:
priority不是30000,而是19990message_mode是old_string而不是olivos_string
为什么呢?不应该是比 20000 更高,从而可以使得.bot off后被关掉吗?
别急,这里既然设定比20000低肯定是有原因的,具体原因之后会解释的。
加载入口(init.py)
这部分内容和插件模板里面基本一致,新建的文件都得从这里导入后加载至 OlivOS 里
import OlivaDiceCore # 注:本插件的注入功能需要依赖OlivaDiceCore,所以一定要导入OlivaDiceCore
from . import main
from . import msgReply
from . import msgCustom
from . import msgCustomManager
主文件(main.py)
这部分内容和插件模板里面基本一致
import OlivOS
import YourPluginName
import OlivaDiceCore

class Event(object):
    def init(plugin_event, Proc):
        # 初始化插件时调用
        # 这里可以进行一些全局的初始化工作,比如加载配置文件、初始化数据
        YourPluginName.msgReply.unity_init(plugin_event, Proc)

    def init_after(plugin_event, Proc):
        # 在所有插件初始化完成后调用
        # 这里可以进行一些依赖于其他插件的初始化工作
        YourPluginName.msgReply.data_init(plugin_event, Proc)

    def private_message(plugin_event, Proc):
        # 私聊消息处理
        YourPluginName.msgReply.unity_reply(plugin_event, Proc)

    def group_message(plugin_event, Proc):
        # 群聊消息处理
        YourPluginName.msgReply.unity_reply(plugin_event, Proc)

    def poke(plugin_event, Proc):
        # 戳一戳事件处理
        # 这里可以添加戳一戳的处理逻辑
        pass

    def menu(plugin_event, Proc):
        # 菜单事件处理
        # 这里可以添加菜单事件的处理逻辑
        # if plugin_event.data.namespace == 'YourPluginName':
        #     if plugin_event.data.event == 'YourPluginName_Menu_001':
        #         pass
        #     elif plugin_event.data.event == 'YourPluginName_Menu_002':
        #         pass
        pass
注:为了和 OlivaDiceCore 看齐,也为了方便于编写函数,我这边把消息处理全放到了msgReply.py文件里
回复自定义管理文件(msgCustomManager.py)
这里一般情况下不用动,这是 msgCustom.py 的自定义回复管理器,是往帮助文档/GUI中注入自定义回复的地方
import OlivOS
import OlivaDiceCore
import YourPluginName
import os
import json

has_NativeGUI = False
try:
    import OlivaDiceNativeGUI
    has_NativeGUI = True
except ImportError:
    has_NativeGUI = False

def initMsgCustom(bot_info_dict):
    for bot_info_dict_this in bot_info_dict:
        if bot_info_dict_this not in OlivaDiceCore.msgCustom.dictStrCustomDict:
            OlivaDiceCore.msgCustom.dictStrCustomDict[bot_info_dict_this] = {}
        for dictStrCustom_this in YourPluginName.msgCustom.dictStrCustom:
            if dictStrCustom_this not in OlivaDiceCore.msgCustom.dictStrCustomDict[bot_info_dict_this]:
                OlivaDiceCore.msgCustom.dictStrCustomDict[bot_info_dict_this][dictStrCustom_this] = YourPluginName.msgCustom.dictStrCustom[dictStrCustom_this]
        for dictHelpDoc_this in YourPluginName.msgCustom.dictHelpDocTemp:
            if dictHelpDoc_this not in OlivaDiceCore.helpDocData.dictHelpDoc[bot_info_dict_this]:
                OlivaDiceCore.helpDocData.dictHelpDoc[bot_info_dict_this][dictHelpDoc_this] = YourPluginName.msgCustom.dictHelpDocTemp[dictHelpDoc_this]
        if has_NativeGUI:
            for dictStrCustomNote_this in YourPluginName.msgCustom.dictStrCustomNote:
                if dictStrCustomNote_this not in OlivaDiceNativeGUI.msgCustom.dictStrCustomNote:
                    OlivaDiceNativeGUI.msgCustom.dictStrCustomNote[dictStrCustomNote_this] = YourPluginName.msgCustom.dictStrCustomNote[dictStrCustomNote_this]
    OlivaDiceCore.msgCustom.dictStrConst.update(YourPluginName.msgCustom.dictStrConst)
    OlivaDiceCore.msgCustom.dictGValue.update(YourPluginName.msgCustom.dictGValue)
    OlivaDiceCore.msgCustom.dictTValue.update(YourPluginName.msgCustom.dictTValue)
    if has_NativeGUI:
        OlivaDiceNativeGUI.msgCustom.dictStrCustomNote.update(YourPluginName.msgCustom.dictStrCustomNote)
回复自定义文件(msgCustom.py)
可以在这里编写自定义回复
import OlivOS
import OlivaDiceCore
import YourPluginName

dictStrCustomDict = {}

dictStrCustom = {
    'strTemple': '这里写自定义回复',
}

dictStrConst = {
}

dictGValue = {
}

dictTValue = {
    'tTempleResult': '这里写默认值'
}

dictStrCustomNote = {
    'strTemple': '【temple】命令\n这里写自定义回复对应的说明',
}

dictHelpDocTemp = {
    'help参考': '''【help参考】
这是一个help模板,您可以在这里添加你想写的help。''',
}
这些字典的功能:
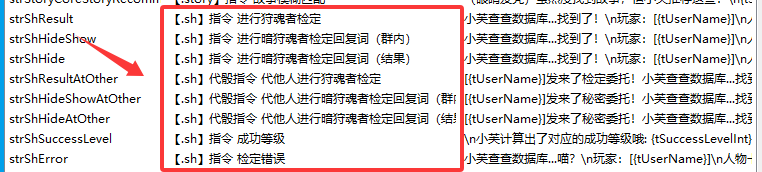
dictStrCustomDict:存储每个Bot的自定义配置,用于覆盖默认的文本消息,一般为空dictStrCustom:定义默认的文本消息模板,编写自定义回复的地方,如'strShHideShow': '[{tName}]进行了暗狩魂者检定'dictStrConst:存储系统级别的常量字符串,显示在终端上的回复,一般无用,如'strShowVersionOnLog' : '当前版本为[{tVersion}]'dictGValue:全局变量字典,提供全局可访问的变量,如机器人名称、版本号等。如'gBotName' : '我'dictTValue:模板变量字典,用于动态替换消息模板中的占位符。如'tName' : 'N/A'dictStrCustomNote:自定义回复说明字典,用来写GUI中自定义回复中说明那一栏目,字典中键值要和dictStrCustom里一一对应。如'strShHideShow': '【.sh】指令\n进行暗狩魂者检定回复词(群内)'
- dictHelpDocTemp:自定义帮助文档。这里为自定义注入帮助模板的位置,以上方代码块的
help参考为例,此时输入.help help参考,bot就会回复对应的值。
功能文件(msgReply.py)
由于该文件代码行数过多,推荐下载后打开文件跟着阅读
默认函数
msgReply.py 是插件的核心功能文件,负责处理消息事件、解析命令并回复消息。该文件通常包含三个主要函数:unity_init、data_init和 unity_reply。
unity_init(plugin_event, Proc)
- 作用:在插件初始化时调用,用于进行一些全局的初始化工作,比如加载配置文件、初始化数据等。在模板中,该函数为空,但你可以在这里添加初始化代码。
data_init(plugin_event, Proc)
- 作用:在所有插件初始化完成后调用,用于进行一些依赖于其他插件的初始化工作。在该函数中,我们调用了
YourPluginName.msgCustomManager.initMsgCustom,将自定义回复注入到 OlivaDiceCore 中,以便在 GUI 中管理。注意:该函数非常重要,它确保了自定义回复能够被正确加载。
unity_reply(plugin_event, Proc)
- 作用:处理私聊和群聊消息。该函数是消息处理的核心,它会解析消息内容,判断是否是命令,并执行相应的操作。
当然,你也可以自行添加其他的消息函数,例如实现戳一戳等功能,这里就不再赘述了。
工具函数
在 unity_reply函数中,我们首先初始化了一些变量和工具函数,这些变量和函数大多来自 OlivaDiceCore.msgReply 模块,具体说明如下:
replyMsg:用于回复消息的函数isMatchWordStart:检查字符串是否以指定的前缀开头。getMatchWordStartRight:从字符串中移除指定的前缀,并返回剩余部分。skipSpaceStart:跳过字符串开头的空格。skipToRight:跳过指定的字符串(通常用于跳过回复消息中的CQ码)。msgIsCommand:判断消息是否是命令(即以命令前缀开头,如点号或at机器人)。
默认模板提供的可调用变量
在本教程提供的默认模板中,提供了一些默认功能,具体如下(可能还有其他的):
tmp_reast_str -> string
- 作用:经过预处理的原始消息文本
- 处理步骤:
- 移除回复消息的CQ码
- 移除@机器人的标记
- 移除命令前缀
flag_force_reply -> boolean
- 作用:强制回复标志(当用户@机器人时自动设为True)
- 意义:即使机器人关闭状态也会响应
flag_is_from_group -> boolean
- 作用:消息来源标识(True=群聊,False=私聊)
- 关联操作:控制群聊专属功能(如暗骰)
flag_is_from_master -> boolean
flag_is_from_group_admin -> boolean
flag_is_from_group_sub_admin -> boolean
添加自定义命令
在 unity_reply函数的最后,我们可以添加自己的命令。例如,在模板中,我们添加了一个 testcommand命令:
if isMatchWordStart(tmp_reast_str, ['testcommand','testcommand2'], isCommand = True):
    tmp_reast_str = getMatchWordStartRight(tmp_reast_str, ['testcommand','testcommand2'])
    tmp_reast_str = skipSpaceStart(tmp_reast_str)
    tmp_reast_str = tmp_reast_str.rstrip(' ')
    tmp_reply_str = None
    # 设置模板变量 tTempleResult 的值
    dictTValue['tTempleResult'] = str("123456")
    # 使用 dictStrCustom 中的 'strTemple' 模板,结合 dictTValue 中的变量,生成回复消息
    tmp_reply_str = OlivaDiceCore.msgCustomManager.formatReplySTR(dictStrCustom['strTemple'], dictTValue)
    if tmp_reply_str != None:
        replyMsg(plugin_event, tmp_reply_str)
    return
步骤说明:
- 使用
isMatchWordStart检查消息是否以 testcommand或 testcommand2开头。
- 使用
getMatchWordStartRight移除命令部分,然后跳过空格。
- 设置模板变量
tTempleResult(这个变量在 msgCustom.py的 dictTValue中定义,这里覆盖了默认值)。
- 调用
OlivaDiceCore.msgCustomManager.formatReplySTR函数,将自定义回复模板(strTemple)和变量字典(dictTValue)结合,生成回复字符串。
- 使用
replyMsg发送回复。
自定义命令中可用的变量
在命令处理过程中,我们可以更新 dictTValue字典,以便在自定义回复模板中使用。例如:
dictTValue['tUserName']:发送者的用户名。dictTValue['tName']:发送者的名字(默认为用户名,但可以替换为人物卡名)。- 还可以自定义其他变量,如
tTempleResult。
注意:在 msgCustom.py中,我定义了回复模板(如 strTemple)和变量(如 tTempleResult),然后在 msgReply.py中,可以动态更新这些变量,并生成最终的回复消息。
其它
或许你已经发现了,上面的app.json中我为什么要将插件的优先级设置成19990。
有两个原因:
- 在此插件中,bot off 后检测到 disable 会直接 return ,就算插件优先级靠前,在 bot off 后也不会误触发。并且只有
message_mode为old_string时才能实现此效果
- 这也是最重要的一点,在 OlivaDiceCore 中,检测到
bot off后,并不是return,而是 set_block 了!而 set_block 会直接阻止消息往下传递,因此如果优先级靠后,则通过@的方式无法触发插件!此处是 OlivaDiceCore 和本教程提供的插件模板进行对比:
        # 此处为OlivaDiceCore中的检测bot off
        # 此频道关闭时中断处理
        if not flag_hostLocalEnable and not flag_force_reply:
            plugin_event.set_block()
            return
        # 此群关闭时中断处理
        if not flag_groupEnable and not flag_force_reply:
            plugin_event.set_block()
            return

	# 此处为插件模板提供的检测bot off
        # 此频道关闭时中断处理
        if not flag_hostLocalEnable and not flag_force_reply:
            return
        # 此群关闭时中断处理
        if not flag_groupEnable and not flag_force_reply:
            return
当然不止这些,其实OlivaDiceCore里还有更多很强大的功能,例如修改人物卡,获取人物卡技能等,这里就不赘述了,可以通过查看OlivaDiceCore的Github仓库,或者是查看OlivOS官方文档的用户模块接口等来进行操作。
其他方面
在最新的 dev 版的 GUI 中,有这么一个功能:配置恢复模块
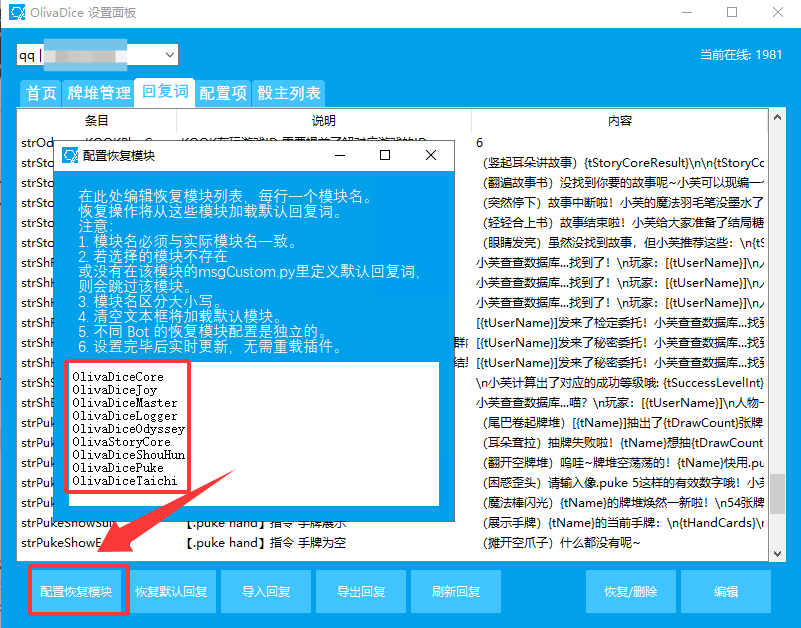
各位在编写插件的时候如果自定义回复的两个文件msgCustom.py和msgCustomManager.py名字没改,且自定义回复写在了dictStrCustom里可以指引用户往这个文件中添加你的插件,这样方便于恢复默认回复
这里是最新 dev 版 GUI 的下载地址:
https://github.com/Desom-fu/OlivaDiceNativeGUI/actions/
结语
借用此贴的一句话
抛砖引玉的根本目的是引玉!
我希望大家能够根据这份教程写出更好的插件!如果你在实践过程中仍有疑问,强烈推荐参考已上线的成熟模块:狩魂者模块(狩魂者跑团专用插件+人物卡模板) - OlivOS论坛 - 青果核
当然,欢迎大家在此贴下进行提问,我会一一进行解答
最后,祝各位开发者 bug 越写越少,没有用户在你的酒吧里点炒饭。
让每一个插件都成为 OlivOS 生态的闪耀星辰!!